Tuesday, December 1, 2015

Scratch Game Design


One of the latest projects in G.T., as you know, is coding. And we had to make a chase game and platform game in a cool program called Scratch. This program is great for beginning programmers and coders. While making these games I had to keep in mind how the people playing my game would feel while playing it. If the game was glitchy and didn't work well, it probably wouldn't make people feel very good and they wouldn't like it . I had to make sure the games ran smoothly. While making the games, I made sure that the coding made the character move and jump smoothly. I made sure that the game worked so people could lose and win.

Best Code
The first game we had to make was a "chase" game. The player's character had to run away from another sprite or character for a certain amount of time or while doing something in order to win. I made my game so that the bananas ran away from the monkey... in space. It's a little random, but it's still a chase game. The second game I made was a platform game with two levels. The objective in the game is to get the orange ball to touch the green squares and if you touch the second green square, you win! If I were to chose I would have to say that the platform (second) game is my favorite. It still have a few things I need to fix, but it's still my favorite. But that's just my opinion. How about you play the games and find out which is your favorite? All you have to do is use the arrow keys to move.


There was a lot of code (for me) in each game, but my favorite would have the be the code I made for jumping in the platform game. It was one of the harder ones for me to find out, because trying to get the ball to move and jump smoothly took a while. When making the platform game I realized that the ball wouldn't go back to the same place when the player lost. It took me a while, but I eventually figured out that I had forgotten to make a couple lines of code. This has been a difficult but fun project so far and I can't wait to see what we get to do next in coding.


^ Freedom Game ^

Tuesday, November 24, 2015

Invention Commercial


My G.T. class and I have recently finished a project. In this project, the main goal was to invent a real invention and make a commercial about it. The commercial had to be serious. We were allowed to have humor in it, but nothing sarcastic. The invention had to be something that could really work and not something that obviously didn't work. While planning, filming, and editing all students had to keep in mind that this commercial should make the audience feel that they can't live without the product. During critiques, the class decided whether or not the commercial showed what the invention was, how it works, and how good or bad the entertainment factor is.

There were a lot of great team moments while planning filming and editing, but my favorite would have a moment during the editing. Editing was the easier part of the project. In the beginning of the commercial you can see that my teammate Emma McGinnis falls in slow motion. During editing we decided to put it in slow motion to add more drama. When we slowed it down we realized that the sounds get deeper and slow down too. When we first heard Emma make that sound, we laughed for 10 minutes straight, but we decided to keep it in as a hook so that the audience is immediately entertained.

After Emma, Tessa, and I finished filming all we had left to do was editing and turning it in. Since we put all of the footage onto Emma's computer, she did most of the editing while we helped on the side, but after we got all the basic things into place Tessa and I helped, gave tips, and adjusted somethings. I was actually surprised by how well the commercial turned out. I was also surprised when our commercial got second place for best commercial in class. My team and I are proud and happy with what we made.

Friday, November 6, 2015

Composition Scavenger Hunt


My G.T. class has just recently gotten into groups of three to learn, find, and make videos about composition techniques. In order to make the video we were given a list of composition techniques to find around the school and describe them and what they are. There are lots of composition techniques out there, but the most important one, to me, would have to be rule of thirds subject/scenery. I chose this because the rule of thirds technique shows a lot of simplicity, but it's also interesting and eye-catching.

Out of all the composition techniques, I would have to say that contrast in content is the hardest to do. I say this because when filming you would have to take the time to find a place or thing that stands out from the rest. Like finding a different colored fruit from the ones that you have laid out. It's not impossible, it's actually kind of easy, but I'm just saying that it's the hardest one of all the ones that I've been taught. It just takes more work and searching than the others. I can use it more by possibly practicing it during G.T. projects or even during my own time when I'm making videos. I think it's a really great composition technique and should be used more often.

I can't do this project alone with so many techniques so everyone in my class has been divided into groups of three. My teammates are Emma McGinnis and Tessa Jensen. They are both great teammates who are easy to work with. Emma is very determined and creative. She makes sure to work done, but keeps it fun at the same time. Tessa is also really good. She comes up with great ideas and is good at keeping everybody on track when we start getting off topic. While making the video everyone kind of rotated on jobs. I would hold the camera a couple times, then Emma, then Tessa. I would talk on camera, then Emma, then Tessa. Everyone participated and that made it a lot easier to finish and end with a great finished product. 

Friday, October 23, 2015

Cracking The Code

A while ago my teacher asked all of the G.T. students what they would like to learn during second quarter. There were a lot of replies that said coding. Now, it's second quarter and we have just started an intro to coding. I don't think everyone should HAVE to learn coding, but it's a great thing to know. Everyday technology becomes more advanced and coding is a big part of that. I think that learning code depends most on what job you plan to get. A job based mostly on computers can be a lot easier when you know code. Especially if your job is to pretty much code. While doing the introduction session I got this nice little certificate, too.

I have actually worked with code before the intro session that we did today. A couple years ago I heard about coding and did some research on it. It really caught my interest so I decided to find a website to learn about it. I started practicing more and more everyday and it really helped to understand technology a little more. I learned how to make websites, video games, and even learned about how it helps to create computers, phones, and video games. When I started it was fairly easy, but as you learn more about it can get complicated. You just have to stay determined and focused. My first experience was fun and just a little complicated.

If I could design any program or game I would probably design a game where you play as someone who gets into all kinds of different situations. They can be something serious like a kidnapping or just a trip to the grocery store. Every choice that you make in the game would shape what happens throughout the situation. Certain choices can get you in trouble or other situation may get you something good. Making a game has always been something that I wanted to ever since I thought about the idea for this game and learning coding could really help with that. 

Wednesday, September 30, 2015

My Humorous Monologue


For the past couple weeks I've been working on a humorous monologue. This was one of the easier projects, but I always learn something in G.T. During this project I learned that there are many things to remember when coming up with your own joke. You have to remember timing, consider your audience, practice delivering the joke, and even add gestures. My favorite tip when writing jokes is to consider your audience & avoid the more controversial topics. I love this tip because it is one of the more important ones. When your telling a joke to a certain group of people they will laugh more at a certain topic and may not find others funny at all. It really counts when you deliver your joke and the audience laughs because they can relate to the topic or scenario.

When filming and editing videos it is very important to add padding. Padding the few seconds of silence before anything happens in a video. With an extra 5 seconds in the beginning and the end editing can be a lot easier. This way there is a few seconds to fall back on when editing and the talking or video does not get cut off in the beginning or end. Padding is a great strategy to remember when filming and could possibly save your video.

When you are make a video there is always something that you could improve on, whether big or small. In this project my weakness would have to be my lack of b-roll. One of the requirements for this project was to have 10 b-roll shots and I only had 6. My greatest strength would have to be the audio/voice-over because I was clear and the music wasn't so loud that you couldn't hear me, but it was loud enough that you could hear it behind my voice. 

Monday, September 21, 2015

Comedy Writing

For this project in G.T. we're doing a comedy based project. We're going to focus on the humor in certain situations. A sense of humor is a very important character trait if you want to people to be comfortable around you. A sense of humor can make someone an easier person to talk to. A sense of humor can reduce stress and worry. It catches people's interest and tells them that the person can look on the better side of things.

There are many things that make a good humorous narrative. First, you have to see that your narrative is not a topic that can offend or upset the audience. Look who you're telling the narrative to and try avoiding the more controversial topics. Also, timing is key. When telling a joke or humorous narrative the timing can't make the listeners feel that you told the joke too fast or waited to long to deliver the punchline. Keep an eye on that. Another tip is to be confident when telling the joke. It always makes the audience feel good to see a confident person telling the the joke. Before delivering the joke, be sure to practice it. Memorizing the joke before telling it always helps. It shows that you are prepared and may even sound better. Last, but not least, when writing a humorous narrative it is good to make it about something that you are educated on. Knowing about the subject of the joke can help you a lot while writing it.

My comedic monologue describes the struggle that I have with my hair. Like a lot of other people my hair is very hard to deal with at times and that is what the comedic monologue is all about.  I give descriptions and scenarios that include my hair and how I deal with it. I feel that my comedic monologue is funny mostly because it is relatable. There are many different hair types and most can hard to deal with at times. If there are others with the same hair type as me (and I'm sure there are) they will probably agree with me on most of what is in the monologue. Another thing that makes my comedic monologue funny is that I sometimes compare my hair to certain things. I am working on the visuals for the monologue so hopefully it turns out good and even makes just a few people laugh. 

Tuesday, September 1, 2015

Motivational Poster


At the moment everyone in my G.T. class is making motivational posters. In order to meet our teacher's expectations we have to require certain things in the poster. We need to have 4 images total. 3 of them being the symbolic images that I had in the last blog post and 1 of them being a portrait photo of my face. We also need 2 text layers, one of them being the manifesto and the other being our personal quotes. Our manifesto and personal quotes have to be spread across the whole page and kerned, leaving no blank spaces. There has to be a triadic color scheme with 1 dominant color and 2 other colors that accent it. We also have blending options for the text layers such as drop shadow, stroke, outer glow, and bevel & emboss. We may also have adjustment layers like levels, curves, exposure, and color balance. I need to try my best to make this poster high quality and meet all the requirements.

In order to start the poster I had to have my personal quotes and full manifesto. When I finished that I copied them and pasted them into Photoshop. After putting the personal quotes and manifesto into two separate layers, I kerned them so they filled up the whole screen with no spaces. When I finished kerning I put my 3 symbol images and my 1 portrait image of me. I arranged them so they were neat and lined up. After I finished arranging the photos I chose my triadic color scheme. I put one of my colors on the personal quotes along with bevel & emboss and stroke. I did the same with my manifesto just a different color. After that I added the last of color of my triadic color scheme to my images in the back. I made sure everything looked right and I was finished.

There are always challenges in projects, but the biggest one in this project would have to be kerning the text so it took as much space possible while still looking neat. Kerning the text was what I spent most of my time on throughout the whole project. I still think that I could've made it look better, but I did my best. I am happy with the outcome of this project and I can't wait for more.


Sunday, August 23, 2015

Personal Manifesto

Symbol 1: Like a tree, I have many
branches, twists, and turns. 
Hi! It's a new year at Kapa'a Middle School and that means a new year of G.T. so here are a few things about me. I play 3 instruments which are ukulele, piano & guitar. I am in the G.T. program at my school. I love to read and write during my free time. Photography has always been something that I am very passionate about. When I grow up I want to go to school to become an optometrist.

Here is my manifesto:
Symbol 2: Like a fawn, I am young,
timid, and wary.

Be kind whenever possible. It is always possible. It does not matter how slow you go as long as you do not stop. Stay positive. Life only gets bad when you let it. Always look on the bright side. Live, Laugh, Love. Never give up. You have the right to be happy. Dream. Laugh. Give it your all everyday. Be yourself. People can't put you down unless you let them. Be confident. Stay focused. No one else can love you unless you love yourself first. Do what you love. Express yourself. Smile often. Learn from your mistakes. Don't let the little things bring you down. Be a role model. Always do your best. Stand up for yourself. Don't underestimate yourself.

Symbol 3: Like my dog, I am lazy
and sleepy, but I am also loyal and
affectionate. 
My manifesto applies to my readers because everyone eventually has a time where they feel like giving up, but being positive and looking on the bright side can make a big difference in the situation. I wanted to send the message to be confident and never let people's judgements stop you from reaching your goals. My favorite part would have to be "Stay positive. Life only gets bad when you let it." because attitude really is everything.


Saturday, May 9, 2015

Lyrical Livelihood


At the moment, my favorite song would have to be If I'm James Dean, You're Audrey Hepburn by Sleeping With Sirens. It's basically about someone to is asking someone they love to stay with them. They know that everything isn't perfect and that they will have problems, but they will always be able to work it out. The lyrics make me feel that throughout your whole life you have relationships with people. Relationships with family, friends, and lovers. It reminds me that there are always hard times, but no matter what you have to work hard and remember that you have to get through it for the people that you love.

The music video song that my partner, Neliza Iannuzzi, and I chose is Roger Rabbit by the band Sleeping With Sirens. Choosing the song was a hard decision to make, but eventually we chose the song. We chose this song because it is relatable to almost everyone. Everyone has gone through a problem at least once in their life whether it was minor or big. Most of the time when you have a problem you ask someone for help or advice, but they can't really fully understand the situation unless you can fully understand it yourself.

Throughout the music video you will see that Neliza has a problem and she comes to me for help. I cannot understand her situation and I can't really give her advice on it. After we stop talking she realizes that she has to fully understand the situation before she can expect someone else to understand it. In the end she starts to understand the situation and she begins to solve it.

Friday, May 8, 2015

Animation Outtakes


Bouncing Ball GIF 
I am doing this animation project with three of my classmates. They are Kyler Sukehira, Nathan Gardner, and Charles McConnell. Kyler is a hard working student. He's always determined. Nathan is creative and came up with good ideas during the project. Charles likes to skate.

Stop motion is an animation that includes an object that is moved by someone every time there is a new frame. Stop motion is usually done with clay or just an object you can find anywhere and take a picture. Someone is supposed to move the object, take a picture, and just do that over and over again so it looks like the object is doing something when you put them all together in order. .GIF stands for Graphics Interchange Format. It is a format that supports up to 8 bits per pixel for each image. When you see it, it will just play over and over again. It is almost like a video, but it has no sound.

In our animations my teammates and I are telling all our stories. I'm pretty sure all of us have seen litter and not just at a beach, but anywhere. Our animation tells a story about Nathan and how he sees a tourist littering at the beach. He then goes to his community and gathers a group that will help to stop the littering and pick up the trash. The audience should care because littering has become a big problem on Earth. It is everywhere. In the ocean, the mountains, and of course in the cities. If people pitched in and helped it could all make a difference.                                                        

Friday, May 1, 2015

Our Animation Story


The focus statement that my team and I chose is "Nathan Rescues Marine Life." This statement tells "my story" because I go to the beach sometimes and notice the litter. Unfortunately I don't do anything about it because I do not want people to think of me in a certain way. I thought that this was a good idea because showing people that it is good to stand up for what you believe in. Pollution is a big issue on Earth and this video is just a little contribution to showing that it is okay to help.


Just by reading the focus statement you can probably tell a lesson that the audience will learn. My team and I wanted to send out a message about how litter and pollution injures and even kills the marine life. We want the audience to know that by throwing away your trash and recycling your cans and bottles you can help to save marine life and prevent animals in the ocean from dying. The audience can learn this lesson by watching Nathan and the people he gets from the community help to pick up the trash on the beach.

There were many moments during the making of this project, some good some bad. The worst moment would probably have to be, in my opinion, the editing. I think this because of how many choices we had in iMovie. A couple people wanted certain things and others wanted other things. It took a while, but we finally settled on what we had on the video. Our best moment, in my opinion, would have to be the filming. During the filming there were complications, but it was the least complicated part throughout the whole process. 

Friday, April 10, 2015

Typography Images

Alexander Graham Bell
Mrs. Sanderl
Typography is the art of arranging letters and words to make a certain image. It can be used to make an image like a portrait. A a typography image can make a lasting impact by showing someone a new type of art. It can also make a lasting impact by giving someone a new way to view object and even people.

Me
My biggest challenge during the typography project that was the picture of me was the colors and trying to make the image looks like me. Although towards the end I could never make the image look like me it was still the biggest challenge for me. I could never fully overcome the issue, but I did make it look better. I think that in order to make the image better I had to play around with the colors of the words and highlights and the midtones. Again, I am disappointed with the way it turned out and I know I could have done a lot of things to make it look better.

In total, I have 3 examples which are of an art teacher in my school, Mrs. Sanderl, a famous innovator, and me. There are many differences between the 3 examples. The typography image of Mrs. Sanderl was one of the easier ones to make and also my #1 favorite out of all of them. The white background and colors look good together and it is very easy to tell that it is her. The typography image of the famous innovator, Alexander Graham Bell would be my second favorite out of the 3 examples. In this typography image it is also easy to see his face. In this particular image the class had to make it only black & white. And last but not least is the typography image of me. I would say that this one is my least favorite because of a couple things. 1) It looks nothing like me and 2) I did not put a background color which probably would have made it look better.


Tuesday, March 3, 2015

Double Exposed Portraits

Multi Exposure
Portrait photography is a type of photography that shows a person or group of people that displays the mood and personality of the subject. A majority of the time, portraits just show the subject's face, but this can include the body and background. Profile view and silhouetting are very different from portrait photography, but at the same time they relate. Silhouetting is the act of casting or showing the subject as a dark shape or shadow against a lighter background. It is used in the Double Exposure project that my class is doing.

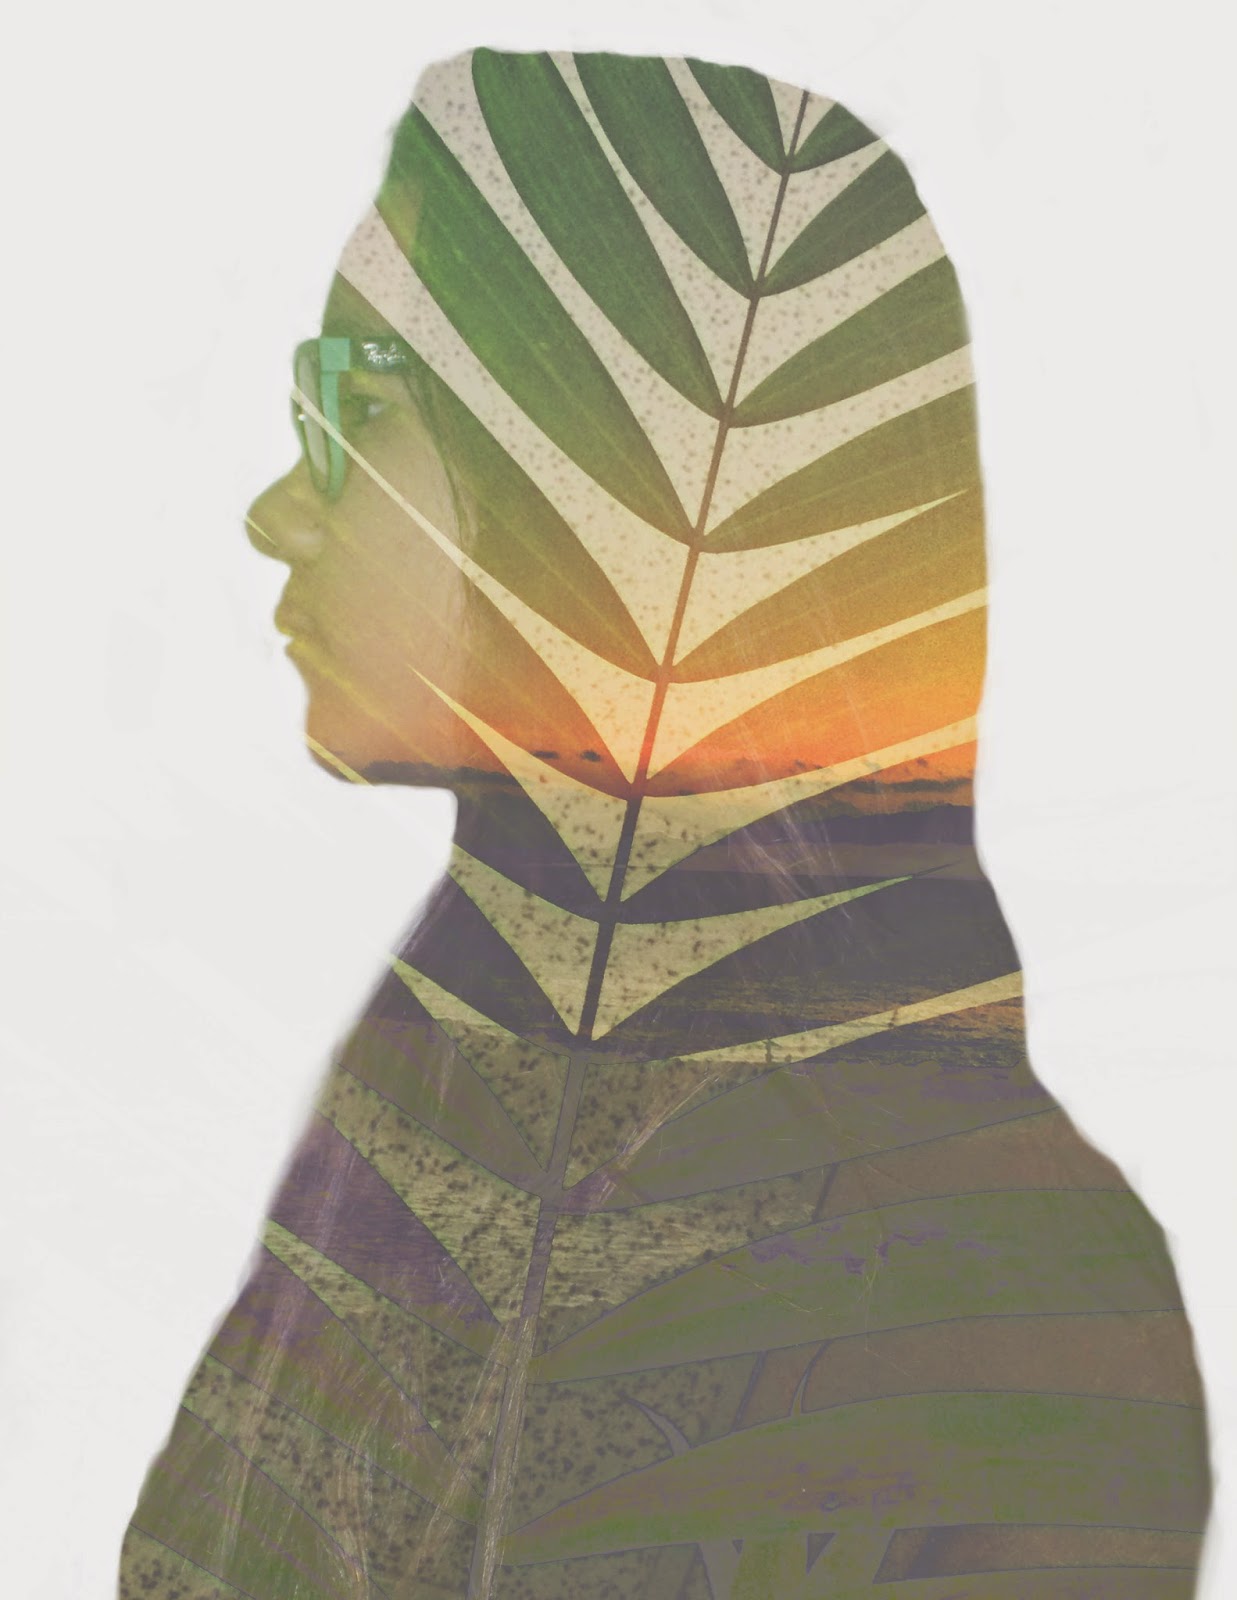
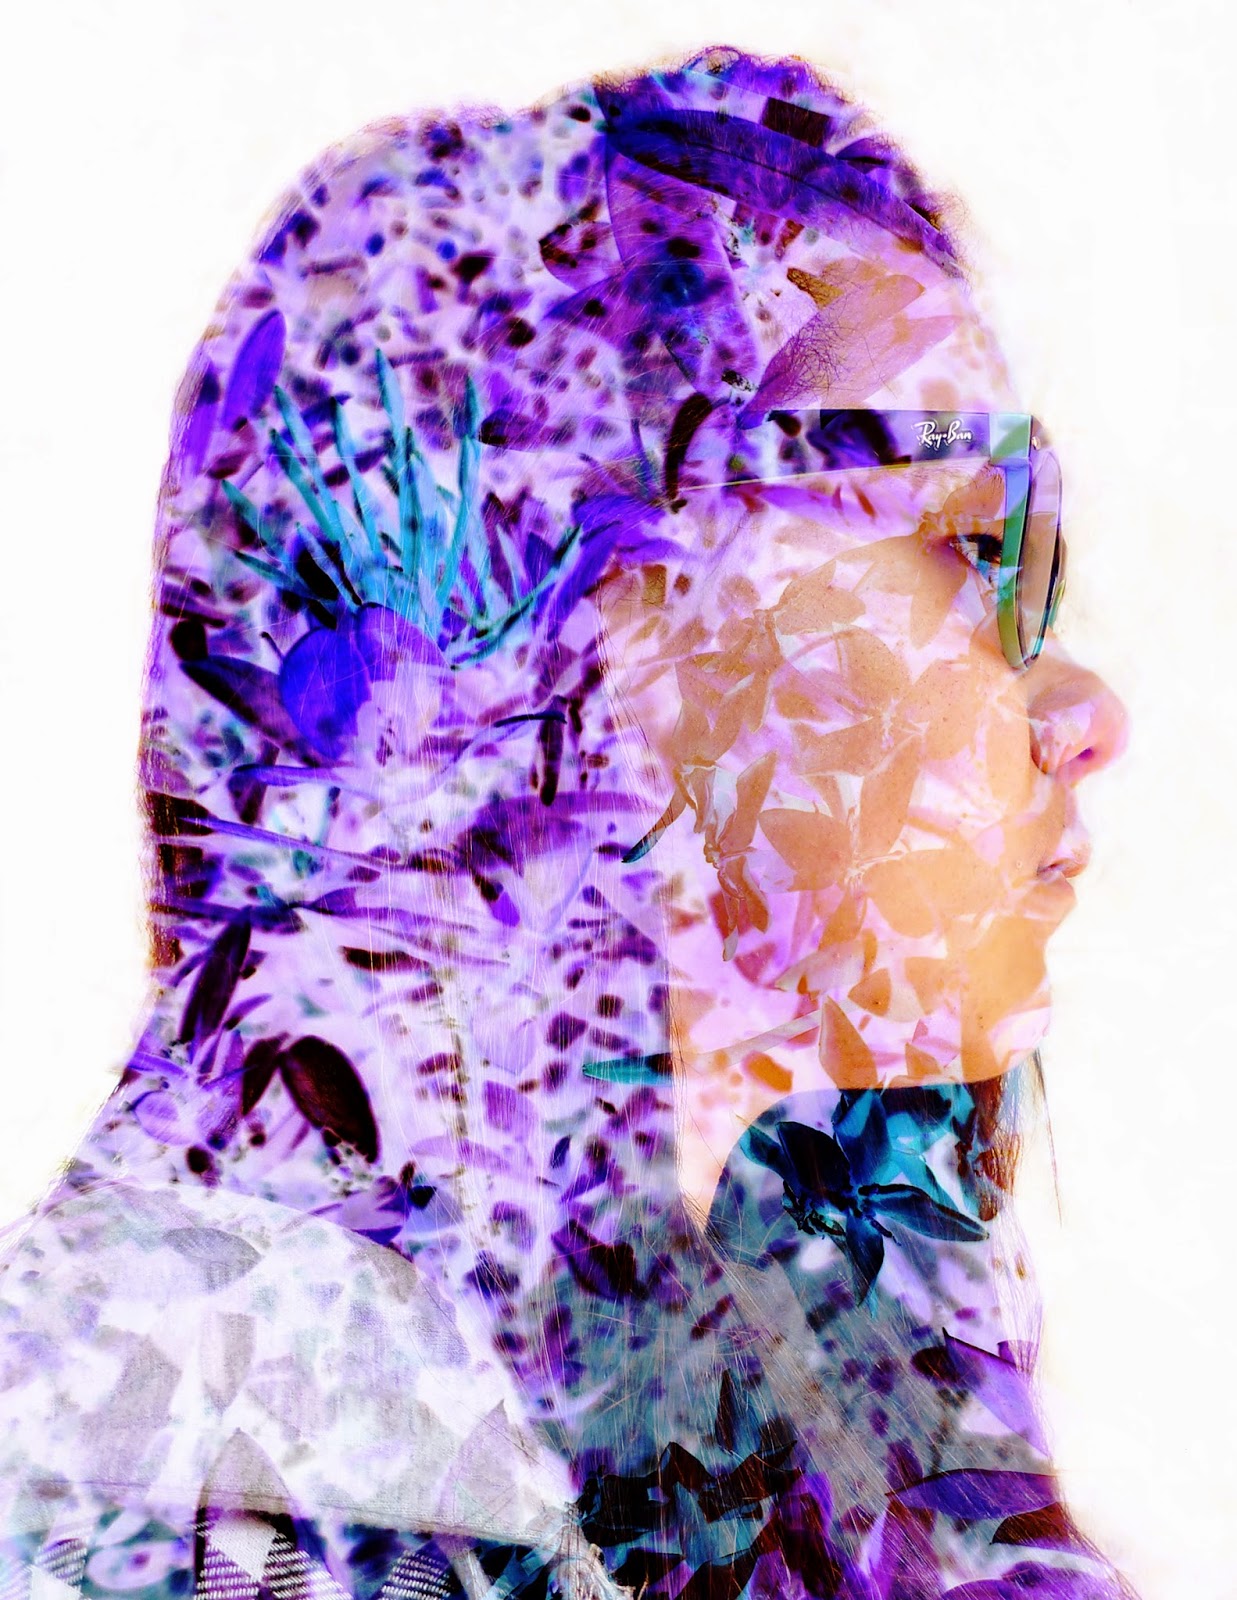
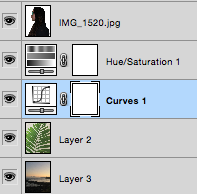
Double exposures are by created in Photoshop by opening the program and going to File > Scripts > Load Files Into Stack. You choose the pictures that you would like to use and then you wait for the program to load them into a stack. It will not take too long, but when they do come up they may not all be the same size. If you took your pictures on devices like a phone camera then they may or may not come out very small compared to the other pictures. If they are small then you have to enlarge them using the move tool. Remember to always hold down Shift while you are sizing a picture or else when you are done it will look distorted. After you resize the images you have to crop the profile picture of you or the main subject of the picture. You use the Crop tool and be sure that it is sized to 8.5" by 11". Like a sheet of paper. While cropping the image keep in mind that you have to have an equal amount of space between the back of the subject's head and their nose. You have to have space between the top of the subject's head and the top of the frame. You then have to go to the Dodge tool and heighten the exposure around the subject's face and body until the background is either completely white or almost completely white (your choice). In order to see all of the pictures that are behind the profile picture you have double click each layer and go to the settings. After that you have to go to the Blend Mode and change it from "Normal" to "Screen."  Then, to make it your own you are going to go to Layer > New Adjustment Layer. When you are there you can choose from many different layer adjustments that you can add to the double exposure.

The symbols that I used in my two visual examples are a plant leaf and a sunset. Now, part of the assignment was to use two or more pictures that symbolized you. I used two pictures. The plant leaf symbolizes my love for nature. I've always loved nature and the beauty that it shows. I've always wondered how much there is to discover in nature. I've always been one to explore and discover. Behind the leaf there is a sunset at a beach. When I chose to use the sunset I was thinking about how sunset represents the end of the day. For me everyday is an adventure and every sunset is the end to another adventure for me. I do think that in order to make my picture better I could have maybe found better symbols.

Double Exposure

Multi Exposure Layer Adjustments

Friday, January 30, 2015

HDR Photography


Hello. For this project in GT we are doing a little something called HDR photography. First, let's talk about the meaning of "HDR photography." HDR photography is the act of taking several different pictures with different exposure settings to put together into one photo so that you can see everything in the photo. From the sun to the trees. The HDR in HDR photography stands for high-dynamic-range, and that's kind of self explanatory. I myself really like the idea of HDR photography. It's a really cool way to get everything in the picture clearly.
In order to make an HDR image, the first thing that you have to do is find something that you want to take a picture of. When finding something to take a picture of the first thing I recommend you look for is a subject that is almost, or is, completely still. You then have to take seven separate pictures with the exposure changed in each one. The different exposure levels that you use for the pictures are either -3 to +3. Be sure that when you are doing this to make sure that you are not moving the camera, because all of the pictures have to be in the exact same place. When you have all of your pictures together, then you have to get the set of pictures that you think are the best and get them on your computer. You will open Photoshop and go to File > Automate > Merge to HDR. From there you will press "Browse" and select your pictures. Before you press okay you have to make sure that the little box in the corner is checked. Next to the box it should say "Attempt to Automatically Align Source Images." It may take a while to load because program is trying to align all of the pictures as great as possible. When it is done you can edit the picture as you like so it is to your liking. When you are done press okay and you have your masterpiece.

While I was taking the sets of pictures for my two HDR pictures I really had a good feeling about them. It was kind of hard to do the experiment because I kept accidentally moving the camera too much while changing the exposure, but other than that the whole project went really well. I do think that this was a fun school project and it's definitely something that I can do on my free time outside of school. 

Friday, January 23, 2015

Movie Trailer Critique


For this project in G.T. we have done a movie trailer. Our movie was called "The Missing." It was about a girl, Violet, and friends. While walking home together the girls soon find out that they are being followed, and in order for the girls to be safe Violet ends up having to risk her life. The rest of the girls go on a journey looking for their friend. My teammates were Nahele Keale, Jasmine Laplante and Jaesha Mata. Together we went over to Nahele's house and filmed. I acted in the trailer along with my other teammates. Our teacher also gave us a Trailer Plan to complete and we had to out in things like a movie summary, voice acting script, etc.

The requirements were the trailer had to be 1:30-2:30 minutes long, there had to be text layovers, five scenes, voice acting script, dialogue, foley, poster image, and we had to have the audience in mind. Our audience was 1st and 2nd graders. I do not think that we completed all of the requirements. We completed all of them except for the foley and keeping the age of the audience in mind. Other than the foley and audience I think the completed all of the requirements.

For the class critique our teacher, Mr. Sanderl played the Movie Trailer for the whole class and they decided whether or not it was appropriate for the audience, creative and whether or not we included all of the requirements. In my opinion, the results that we got were fair. Considering how much we worked and how much effort we put into doing the trailer, I think that my teammates and I did a good job. It came put out much better than I thought it would.